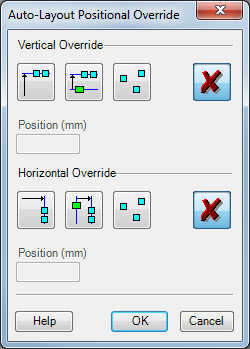
Auto-Layout Positional Override
Use this function to define absolute or relative positioning for selected shapes. For example, you could use Auto-Layout Positional Override to ensure that an Info button is always displayed in the top right corner of a specific shape. During subsequent Auto-Layout operations, the defined positions are retained. You can still move the shapes manually but any use of Auto-Layout will restore the set override positions or offsets.

Absolute Positioning
To set the absolute position of one or more shapes:
- Select the shape(s).
- Select Triaster > Auto-Layout Positional Override. The Auto Layout Positional Override dialog box is displayed.
- Set the Vertical Override:
- Set the Horizontal Override:
- Click on the OK button. The selected shapes are moved to the specified position.
 Click on the Absolute Position button.
Enter the required vertical position of the shape's centre (mm) in the Position (mm) text box. Vertical distances are measured from the bottom of the drawing page.
 Click on the Absolute Position button.
Enter the required horizontal position of the shape's centre (mm) in the Position (mm) text box. Horizontal distances are measured from the left of the drawing page.
Relative Positioning
To set the relative position of one or more shapes:
- Select the shapes in the correct order: select the anchoring shape first and then the shape or shapes to be positioned relative to it.
- Select Triaster > Auto-Layout Positional Override. The Auto Layout Positional Override dialog box is displayed.
- Set the Vertical Override:
- Set the Horizontal Override:
- Click on the OK button. The selected shape(s) are moved to the anchoring shape with the specified horizontal and vertical offsets.
 Click on the Relative Position button.
Enter the required vertical offset from the anchoring shape's centre (mm) in the Offset (mm) text box.
 Click on the Relative Position button.
Enter the required horizontal offset from the anchoring shape's centre (mm) in the Offset (mm) text box.
NOTE: Click here to see a video demonstrating the use of this feature to 'pin' a Hyperlink Circle to the top right corner of an Activity.
Removing Positional Override Settings
 To remove a horizontal or vertical positional override, click on the appropriate Remove Override button.
Retaining an Existing Override Setting
 To retain an existing horizontal or vertical positional override, click on the appropriate No change button.
For example, if you want to change the horizontal override position/offset but retain the vertical value, click on the No Change button in the Vertical Override section.
Set the horizontal position/offset as required and then click on the OK button.
Unless you use the No Change button, an override position/offset is set to the currently displayed value.